
Right out of the box, Cura is pretty powerful. But, sometimes you still just need a little extra functionality. Fortunately, Cura makes this pretty easy to implement. Here is how I do it. Once I figure out which plugin I want to use, I add my login information into Cura. This synchronizes the software on my laptop to my account on the cloud. Then I go to the Ultimaker Marketplace on the web and find the plugin directory. You can add plugins from Cura itself, but I have found it to be very laggy and difficult to use so I just do it from the web. Pick the plugin(s) that you want and add them to your account. Restart Cura and it will ask you to synchronize your account.
Blog
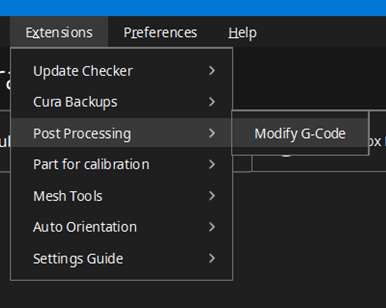
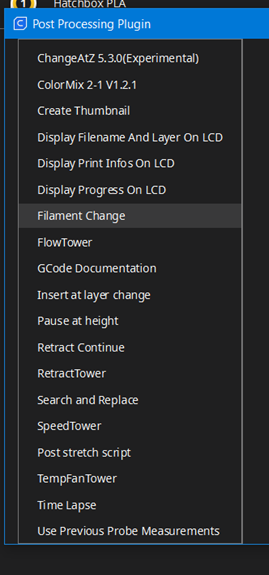
Sometimes, you run out of filament in the middle of your print and need to change it. Other times, you intentionally want to change your filament. For example, you might want to start a print with gold and finish with black. This post is about how I do that. If you already have the plugin setup, go to Extensions, Post Processing, Modify G-Code. Press “Add Script” (the only option available) then select Filament Change. You will need to figure out what height you want the change to occur at, and then convert that into layers. At a 0.2mm layer height, 10mm would be layer 20, for example. From there, just slice your model as normal and Cura will include the command to change filament.
3d printing, inventing, experimenting, they all go together. One of the unfortunate side effects of experimentation is that I sometimes get myself in trouble. I checked a couple of boxes in Cura, just to see what they did. Then I forgot about it. This made for an interesting couple of days while I tried to figure out why all of my holes disappeared when I sliced my model. Upon further research, it turns out that this setting does have a good purpose. Sometimes, designers will introduce internal cavities into a model to suit a particular manufacturing process. These don’t work well when 3d printing, so rather than forcing designers to remove all of the internal cavities Cura just included this button for them.

On a complex piece of machinery like a 3d printer, there are many things that can go wrong. One thing that I see, from time to time, is that the machine won’t home. The first thing that I check when this happens is the cables. Every once in a while, a cable can get situated right between the Z sensor and the Z motor and prevent the Z axis from homing correctly.
Changing your printer Nozzle
Sometimes you need to change your nozzle. I do this most frequently when I change filament materials or when I need more details. I made a jewelry box for my wife last year and I used a wood PLA filament. Most hobby printers (including mine) use a default 0.4mm nozzle tip. The wood clogged my tip, so I switched it out to a larger tip. Other times, I want to print figurines for my kids with a lot of details so I want to switch to a smaller tip.
Here is what I do:
- Heat up the extruder. I’ve found that the hot end material contracts around the nozzle tip. Heating it up expands the hot end and makes the nozzle easier to remove.
- Remove the old tip
- Insert the new tip
- Adjust the nozzle size and line width in Cura (or other preferred slicer)
- Calibrate e-steps to compensate for new flow rate
- PID tune to adjust heating properties
- Level bed
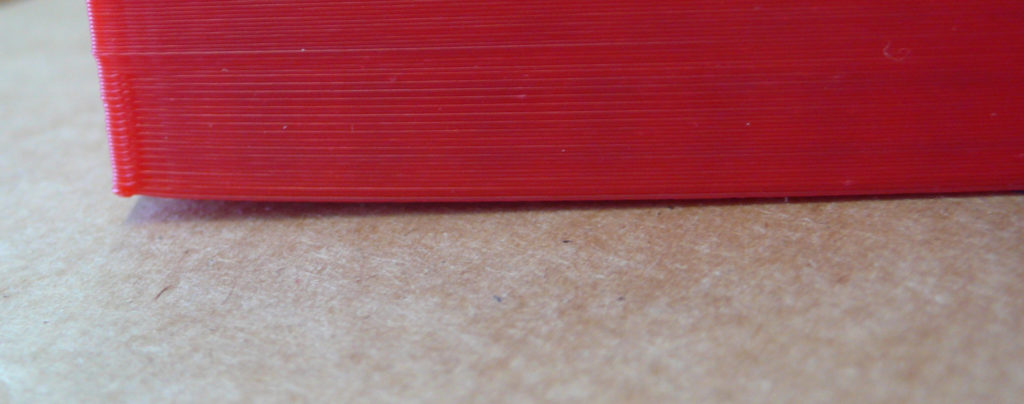
I hear a lot of people that have difficulty with their prints curling off of the bed. This can be caused by a number of different things, which I will outline below:
- The most common problem is that the bed is not clean. The solution to this is also simple. Clean the bed. I use isopropyl alcohol with a lint free cloth before and after every print.
- Another common problem is that the nozzle is too near or too far from the bed and the filament doesn’t stick properly, then over time it pulls away from the bed. If this is the case, then you need to level the bed. It could also be that your bed itself is warped, in which case I usually recommend that people look into a mesh bed level.
- Temperature is another important aspect to making sure that your prints don’t warp. During the winter, I use an enclosure to ensure that the temperature around my printer is stable. For the first 2-3 layers, I also raise the bed temperature and the nozzle temperature by about 5 degrees and turn off any cooling.
- Speaking of cooling, too much cooling can also warp your print. Adjust your fan settings so that it doesn’t cool too fast and warp.
Something to consider. I see many people giving the advice of adding painter’s tape or glue onto their bed to make the filament stick better. This is only my personal opinion, but I believe that this masks any real issues that your machine may have. I believe that it’s far better to fully understand the mechanics of the root cause of the warping and address that, rather than just adding some glue and hoping for the best.
[boldgrid_component type=”wp_block”]
Mesh Fade
I recently saw a question on a forum about a warped bed. The question had to do with whether or not the top of the part would also be warped because it follows the bed shape. You can avoid this in Klipper by implementing mesh fade in your bed mesh block. Below is a complete bed mesh block, the last 2 lines are the significant ones to implement mesh fade. Fade_start tells Klipper to start expanding or contracting layers, starting at 1mm height to start to normalize everything. Fade_end tells Klipper that the fade should be complete by a height of 10mm. So, at 10mm and upwards, the top of the part should be flat even though the bottom of the part will follow the bed’s contour.
[bed_mesh]
speed: 120
horizontal_move_z: 5
mesh_min: 35, 6
mesh_max: 240, 198
probe_count: 5, 3
fade_start: 1
fade_end: 10